From Optflux
(→Configuring the structure of your plug-in directory) |
(→Configuring the structure of your plug-in directory) |
||
| Line 36: | Line 36: | ||
# To understand the structure and contents of the plugin.xml file, please refer to the [[Developers#Plugin.xml]] section. | # To understand the structure and contents of the plugin.xml file, please refer to the [[Developers#Plugin.xml]] section. | ||
## We Provide an almost empty sample here just for reference [[File:plugin.xml]] | ## We Provide an almost empty sample here just for reference [[File:plugin.xml]] | ||
| − | ##: [[Image:release9. | + | ##: [[Image:release9.png]] |
# Filling the sub-directory structure with rational packages is the next step. Since AIBench/OptFlux development is based on 3 main artifacts we usually sub-divide our java classes by those 3 artifacts. | # Filling the sub-directory structure with rational packages is the next step. Since AIBench/OptFlux development is based on 3 main artifacts we usually sub-divide our java classes by those 3 artifacts. | ||
#: This means that '''we should create 3 sub-packages''', one for the OPERATIONS, one for the VIEWS and one for our DATATYPES. | #: This means that '''we should create 3 sub-packages''', one for the OPERATIONS, one for the VIEWS and one for our DATATYPES. | ||
#: Please note that this is optional. AIBench/OptFlux are agnostic to this, we just find it easier and more structured this way. | #: Please note that this is optional. AIBench/OptFlux are agnostic to this, we just find it easier and more structured this way. | ||
#: You should get something like this | #: You should get something like this | ||
| − | #: [[Image:release10. | + | #: [[Image:release10.png]] |
Revision as of 23:56, 2 December 2010
Contents
Creating a new project for your plug-in
- Begin by Running Eclipse
- Having downloaded the release from the website, let's begin creating a New Java Project
- Give a name to your project and:
- select the Create project from existing source;
- select the path to the directory where you extracted the OptFlux release.
- press next;
- Press the Create new source folder link
- Add a name your plug_in, preferably under plugins_src folder
- Switch to the Libraries tab
- Press the Add JARs... button
- Add any jar library under the lib[your_architecture] folder. In the example we are adding some extra libraries for MacOS X (darwin64)
- Your Eclipse workspace should look something like:


Configuring the structure of your plug-in directory
- Right-click the plug-in source folder (plugins_src/myplugin4optflux) and:
- Press Add -> New -> Package
-
- Name it whatever you like. We like to use the same name for the first folder in the directory structure. In this case myplugin4optflux
-
- Press Add -> New -> Package
- Create the mandatory plugin.xml file:
- Right-click the plug-in source folder (plugins_src/myplugin4optflux) and:
- Press Add -> New -> File
- Name it plugin.xml
- Press Add -> New -> File
- To understand the structure and contents of the plugin.xml file, please refer to the Developers#Plugin.xml section.
- We Provide an almost empty sample here just for reference File:Plugin.xml
-
- We Provide an almost empty sample here just for reference File:Plugin.xml
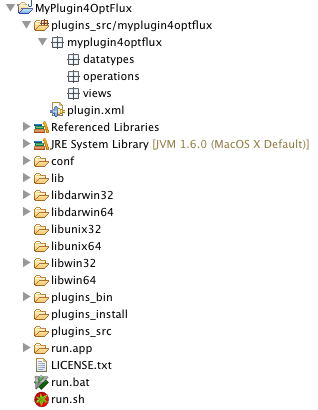
- Filling the sub-directory structure with rational packages is the next step. Since AIBench/OptFlux development is based on 3 main artifacts we usually sub-divide our java classes by those 3 artifacts.
- This means that we should create 3 sub-packages, one for the OPERATIONS, one for the VIEWS and one for our DATATYPES.
- Please note that this is optional. AIBench/OptFlux are agnostic to this, we just find it easier and more structured this way.
- You should get something like this
-