(→Configuring the structure of your plug-in directory) |
(→What does it take to create a plug-in?) |
||
| Line 165: | Line 165: | ||
*** '''</extension>''' - close the declaration of the new extension | *** '''</extension>''' - close the declaration of the new extension | ||
| − | === Testing | + | === Testing your first operation === |
# If everything went well you can execute OptFlux with the '''Run Configuration''' that we created before and you are ready to go | # If everything went well you can execute OptFlux with the '''Run Configuration''' that we created before and you are ready to go | ||
| Line 177: | Line 177: | ||
'''CONGRATULATIONS''' :D - you just created your first OptFlux operation / plug-in (this one is simple though) | '''CONGRATULATIONS''' :D - you just created your first OptFlux operation / plug-in (this one is simple though) | ||
| + | |||
| + | == Creating your first Datatypes == | ||
| + | |||
| + | If you are not already aware, AIBench/OptFlux is Datatype agnostic, that is, you can use whatever Datatypes you want to. However, if you want to improve the interaction of the user with the Datatypes, you can explicitly declare some properties of those same Datatypes. | ||
| + | |||
| + | For a more clear understanding of AIBench explicit Datatypes, please refer here | ||
Revision as of 17:35, 3 December 2010
Contents
Pre-requisites
- Working version of Eclipse IDE
- Working installation of Subversion
- If you wish to work directly with the latest version from the SVN server (OPTIONAL)
- Installation of the Subclipse plug-in for the Eclipse IDE
If you are behind a proxy, please note that some extra-configuration of subversion may be required:
- You will need to edit the servers file and modify it accordingly
- In Unix/BSD based systems (Linux, Mac OS X) you can usually find it under your home directory ~/.subversion/servers
- In Windows systems it is usually in your user specific folder %APPDATA%\Subversion\servers
[global]
# http-proxy-exceptions = *.exception.com, www.internal-site.org
# http-proxy-host = defaultproxy.whatever.com
# http-proxy-port = 7000
# http-proxy-username = defaultusername
# http-proxy-password = defaultpassword
# http-compression = no
# No http-timeout, so just use the builtin default.
# No neon-debug-mask, so neon debugging is disabled.
# ssl-authority-files = /path/to/CAcert.pem;/path/to/CAcert2.pem
http-proxy-exceptions = *.example.com
http-proxy-host = proxy.example.com
http-proxy-port = 8080
http-proxy-username = myuserid
http-proxy-password = mypassword
Creating a new project for your plug-in (From release packages)
- Begin by Running Eclipse
- Having downloaded the release from the website, let's begin by creating a New Java Project
- Give a name to your project and:
- select the Create project from existing source;
- select the path to the directory where you extracted the OptFlux release.
- press next;
- Press the Create new source folder link
- Add a name to your plug-in, preferably under the plugins_src folder
- Switch to the Libraries tab
- Press the Add JARs... button
- Add any jar library under the lib[your_architecture] folder. In the example we are adding some extra libraries for MacOS X (darwin64)
- Your Eclipse workspace should look something like:


Creating a Run Configuration to run OptFlux from within Eclipse
After creating a Project for your plug-in, you will need to create a Run Configuration in order to execute OptFlux from within Eclipse.
- Right-click your project;
- Access the Run As -> Run Configurations menu;
-
- Add a New Launch Configuration (top left icon);
- Fill in the fields as in the example
-
- Switch to the Arguments tab
- Add plugins_bin in the program arguments
- Add -Xmx1024m in the VM arguments (This is optional. It will increase your maximum Java heap space to 1GB. You can select any other value in the allowed range for your VM)
-
- Swich to the Environment tab
- You will need to create entries according to your system
- Windows:
- Variable: "LD_LIBRARY_PATH", value: libwin32
- Variable: PATH, value: libwin32
- Unix:
- Variable: LD_LIBRARY_PATH, value: libunix32 or libunix64 depending on whether you are on 32 or 64 bit operating system
- Variable: PATH, value: libunix32 or libunix64 depending on whether you are on 32 or 64 bit operating system
- MacOS X:
- Variable: DYLD_LIBRARY_PATH, value: libdarwin64
- Variable: PATH, value: libdarwin64
- Windows:
- You will need to create entries according to your system
- Click Apply and Run to see if OptFlux boots up normally


Configuring the structure of your plug-in directory
- Right-click the plug-in source folder (plugins_src/myplugin4optflux) and:
- Press Add -> New -> Package
-
- Name it whatever you like. We like to use the same name for the first folder in the directory structure. In this case myplugin4optflux
-
- Press Add -> New -> Package
- Create the mandatory plugin.xml file:
- Right-click the plug-in source folder (plugins_src/myplugin4optflux) and:
- Press Add -> New -> File
- Name it plugin.xml
- Press Add -> New -> File
- To understand the structure and contents of the plugin.xml file, please refer to the The_Plugin.xml_File section.
- We Provide an almost empty sample here just for reference File:Plugin.xml
-
- We Provide an almost empty sample here just for reference File:Plugin.xml
- Filling the sub-directory structure with rational packages is the next step. Since AIBench/OptFlux development is based on 3 main artifacts we usually sub-divide our java classes by those 3 artifacts.
- This means that we should create 3 sub-packages, one for the OPERATIONS, one for the VIEWS and one for our DATATYPES.
- Please note that this is optional. AIBench/OptFlux are agnostic to this, we just find it easier and more structured this way.
- You should get something like this
- Finally, lets specify the compile directory for our plug-in source code. This is mandatory, since OptFlux will look for the compiled plug-in in a specified directory (plugins_bin by default)
- Access the properties window for your project
-
- Access the build path entry on the list on the left;
- Switch to the source tab;
- Select the Allow output folders for source folders checkbox on the bottom and;
- Select the Output folder for your plug-in and click the Edit... button
-
- Specify plugins_bin/myplugin4optflux as your compilation destination, click OK and we are done.
- Access the properties window for your project


What does it take to create a plug-in?
- Minimum: implement a class declared as an @Operation
- Create your own @Datatype (s)
- Create your own Views for the desired Datatypes
- Create your own GUIs for your Operations (Advanced)
Create your first operation
Our first OptFlux operation is going to be something really simple. Say, we want our first basic operation to simply add two integers.
- Create the MyOperation.java class inside the operations package
package myplugin4optflux.operations;

import es.uvigo.ei.aibench.core.operation.annotation.Direction;
import es.uvigo.ei.aibench.core.operation.annotation.Operation;
import es.uvigo.ei.aibench.core.operation.annotation.Port;

@Operation(description="My first OptFlux operation") //use the operation annotation so that OptFlux recognizes this class as an operation
public class MyOperation {

	int x, y;     // instance variables to keep my two integers

	@Port(name="x",direction=Direction.INPUT,order=1)   // use the port annotation with Direction = INPUT to note that this is an input of the operation
	public void setX(int x){
		this.x = x;
	}

	@Port(name="y",direction=Direction.INPUT,order=2)   // use the port annotation with Direction = INPUT to note that this is an input of the operation
	public void setY(int y){
		this.y = y;
	}

	@Port(direction=Direction.OUTPUT,order=3)                 "// use the port annotation with Direction = OUTPUT to note that this is an output of the operation"
	public int result(){
		return this.x + this.y;
	}
}
- Now let's declare our new operation in the plug-in manifest, the plugin.xml file
- We are extending the AIBench core with a new Operation, that means that we must connect to the operation-definition extension point and declare the new operation:
-
- Let's analyze the contents of this new entry:
- <extension - declaration of the beginning of the new extension
- uid="aibench.core" - This is the uid of the plug-in that contains the extension point
- name="aibench.core.operation-definition" - The extension point to which we will connect
- class="myplugin4optflux.operations.MyOperation"> - The path to the class that contains our operation
- <operation-description - beginning the operation description
- name="My Operation" - The name of the operation (this will be used in the OptFlux menus)
- uid= "myplugin_myoperation" - The UID of our operation (this must be unique and will be useful in the future)
- path="20@Plugins/1@MyOperations" - The path for our operation to be placed in the OptFlux menus (position@menu/position@submenu)
- /> - close the operation description
- </extension> - close the declaration of the new extension
- <extension - declaration of the beginning of the new extension
- We are extending the AIBench core with a new Operation, that means that we must connect to the operation-definition extension point and declare the new operation:

Testing your first operation
- If everything went well you can execute OptFlux with the Run Configuration that we created before and you are ready to go
- You will be able to see your new operation on the menu:
-
- By clicking it, you will lauch the operation. You can see that AIBench rendered a dialog GUI automatically for you. We will see how to create complex GUIs in the future.
-
- Finally, executing the operation will place the result in the Clipboard. This is not the behavior that we expect in the future for OptFlux plug-ins, but we will get there.
- If you click the result object, the default view will be launched with the result
-
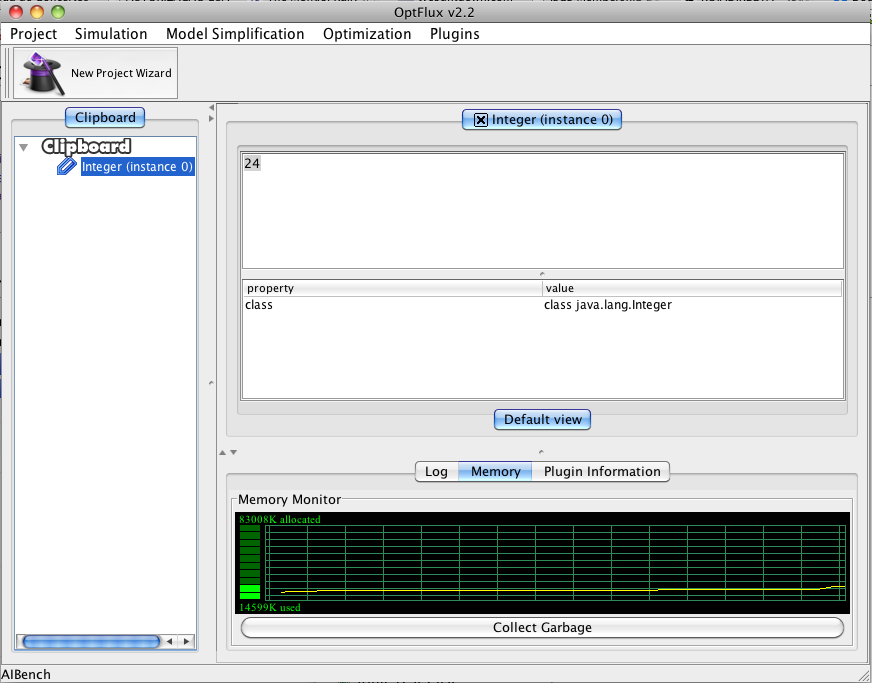


CONGRATULATIONS :D - you just created your first OptFlux operation / plug-in (this one is simple though)
Creating your first Datatypes
If you are not already aware, AIBench/OptFlux is Datatype agnostic, that is, you can use whatever Datatypes you want to. However, if you want to improve the interaction of the user with the Datatypes, you can explicitly declare some properties of those same Datatypes.
For a more clear understanding of AIBench explicit Datatypes, please refer here